Just a quick post to let you all know that there is 20% off in my Ravelry store with the code AUTUMN - there is a definite chill in the air here lately and it is time to start curating project lists and planning the winter's crafting!
Here's the link - happy crafting! redclovercrochet Ravelry store
Wednesday, 16 September 2015

Monday, 31 August 2015
Puff stitch coasters/scrubbies
It's been a while since I posted any new patterns here. I have been busy recently volunteering with a local wildlife group and starting to think seriously about my career now the kids are growing up a little. I've also found myself short of funds so I've had to come up with some thriftier ideas, using up left over scraps and clearing some space in the stash!

I have lots of small amounts of cotton and bamboo yarn left over from other projects so I came up with these versatile little puff stitch confections. They could be used as coasters for drinks, in the bath or shower, for dishwashing... By extending the pattern out a little further they would also make handy pot holders/trivets for the kitchen too maybe. Or you could go crazy and make a bath/shower mat version, or even a throw or blanket!
Coasters measure 3 1/2" across.
For the coasters, you will need
Beg puff stitch group: ch2, *yarn over, insert in stitch and draw up a loop* 3 times, yarn over and draw through all loops on hook, ch2, puff st
Puff stitch: *yarn over, insert in stitch and draw up a loop* 4 times, yarn over and draw through all loops on hook
Beg puff stitch group: ch2, *yarn over, insert in stitch and draw up a loop* 3 times, yarn over and draw through all loops on hook, ch2, puff st
Puff st group: Puff st, ch2, puff st in same space
Puff st inc: Puff st, ch2, puff st, ch2, puff st in same space
Beg puff st inc: beg puff st group, ch2, puff st (3 puff st, 2 ch sps)
By alternating where you put the increase in each round you can avoid your coaster becoming too boxy, in this pattern I have alternated putting the inc at the beginning and end of each 'phrase'.
Pattern begins:

I have lots of small amounts of cotton and bamboo yarn left over from other projects so I came up with these versatile little puff stitch confections. They could be used as coasters for drinks, in the bath or shower, for dishwashing... By extending the pattern out a little further they would also make handy pot holders/trivets for the kitchen too maybe. Or you could go crazy and make a bath/shower mat version, or even a throw or blanket!
Coasters measure 3 1/2" across.
For the coasters, you will need
- 8-10g (25 metres or so) of dk weight cotton, bamboo, linen, or even wool (although be careful of washing instructions!)
- 4mm hook
- darning needle
Beg puff stitch group: ch2, *yarn over, insert in stitch and draw up a loop* 3 times, yarn over and draw through all loops on hook, ch2, puff st
Puff stitch: *yarn over, insert in stitch and draw up a loop* 4 times, yarn over and draw through all loops on hook
Beg puff stitch group: ch2, *yarn over, insert in stitch and draw up a loop* 3 times, yarn over and draw through all loops on hook, ch2, puff st
Puff st group: Puff st, ch2, puff st in same space
Puff st inc: Puff st, ch2, puff st, ch2, puff st in same space
Beg puff st inc: beg puff st group, ch2, puff st (3 puff st, 2 ch sps)
By alternating where you put the increase in each round you can avoid your coaster becoming too boxy, in this pattern I have alternated putting the inc at the beginning and end of each 'phrase'.
Pattern begins:
- Ch5, sl st to form loop. Beg puff stitch inc, puff st inc twice, sl st in top of first puff st (9 puffs, 6 ch sp).
- Sl st across to ch sp. Beg puff st group, puff st inc in next ch sp, *puff st group, puff st inc* twice, sl st to top of first (15 puffs, 9 ch sps)
- Sl st across to ch sp. Beg puff st inc, puff st group in each of the next 2 ch sp, [puff st, inc, *puff st group* in each of the next 2 ch sp] twice, sl st in top of first (21 puffs, 12 ch sp)
- Sl st across to ch sp. Beg puff st group, puff st group in each of the next 2 ch sp, puff st inc in next ch sp, [puff st group in each of the next 3 ch sp, puff st inc] twice, sl st in top of first to join.
Tuesday, 14 April 2015
Beaded Net Curtains - yes, really!
Oh yes I did. I finally got sick of looking at the grubby old nylon things hanging at the windows so I thought I should make some of my own.

These are based on my favourite stitch pattern, I've heard it called linen stitch, granite stitch, grit stitch... in any case it creates a wonderfully floaty light fabric. So I knew it would need some beads to hold it in place!
 I had some left over Mill Hill beads in gold and lilac from other projects (about 3/4 of a pack of each). I chose to add 3 or 4 beads every 3 or 4 rows, starting on row 11. You can just about see them in the second pic!
For yarn, I picked up 2 skeins of my favourite yarn from the LYS in town - King Cole Bamboo Cotton 4 ply. I used around 75g for each curtain.
Each curtain measures 14" width, 38" drop.
Pattern
You will need:
1. With the smaller hook, fsc 78 (or an even number of fsc to fit) (or ch an odd number, sc in 2nd ch from hook - to give an even number of sc), turn. Change up to larger hook
2. Ch1, *sc, ch1, sk1* across, sc in last 2, turn
3 - 10: Repeat row 2
11. Repeat row 2 but add 3 or 4 randomly spaced beads to sc stitches on row, turn.
Continue in pattern: 3 plain rows, 1 beaded row until you reach the length you want. After blocking, 2 rows will measure approx. 1". So my curtains have 75 rows made on the larger hook for 36" length (excl ending loops).
You may choose to add more beads per row lower down.
Finishing rows:
Change back to the smaller (4.5mm) hook, ch1, work 1 sc in each sc and each ch across, turn.
Add a border of your choice - maybe in a contrasting colour. I went for a simple loopy border of 9 chs evenly spaced with a bead in the fifth ch. You could add a filet border, a pineapple border... or even a border borrowed from a pretty shawl.
When the border is finished, fasten off and weave in ends. Rejoin yarn in other side of fsc (smaller hook!). Ch1, sc, *sc, ch3, sc in next, sc* across to end, sc if yo are left with an odd stitch. Fasten off.
Wet block to size, hang and enjoy the morning sun catching the beads!
These are based on my favourite stitch pattern, I've heard it called linen stitch, granite stitch, grit stitch... in any case it creates a wonderfully floaty light fabric. So I knew it would need some beads to hold it in place!
For yarn, I picked up 2 skeins of my favourite yarn from the LYS in town - King Cole Bamboo Cotton 4 ply. I used around 75g for each curtain.
Each curtain measures 14" width, 38" drop.
Pattern
You will need:
- 4.5mm hook
- 9mm hook
- small (0.6mm ish) hook for beading
- blocking equipment
- 2 skeins of 4ply cotton or cotton/bamboo or even wool if your heart desires! I used a cotton/bamboo blend with 371m (400yd) per 100g
1. With the smaller hook, fsc 78 (or an even number of fsc to fit) (or ch an odd number, sc in 2nd ch from hook - to give an even number of sc), turn. Change up to larger hook
2. Ch1, *sc, ch1, sk1* across, sc in last 2, turn
3 - 10: Repeat row 2
11. Repeat row 2 but add 3 or 4 randomly spaced beads to sc stitches on row, turn.
Continue in pattern: 3 plain rows, 1 beaded row until you reach the length you want. After blocking, 2 rows will measure approx. 1". So my curtains have 75 rows made on the larger hook for 36" length (excl ending loops).
You may choose to add more beads per row lower down.
Finishing rows:
Change back to the smaller (4.5mm) hook, ch1, work 1 sc in each sc and each ch across, turn.
Add a border of your choice - maybe in a contrasting colour. I went for a simple loopy border of 9 chs evenly spaced with a bead in the fifth ch. You could add a filet border, a pineapple border... or even a border borrowed from a pretty shawl.
When the border is finished, fasten off and weave in ends. Rejoin yarn in other side of fsc (smaller hook!). Ch1, sc, *sc, ch3, sc in next, sc* across to end, sc if yo are left with an odd stitch. Fasten off.
Wet block to size, hang and enjoy the morning sun catching the beads!
Thursday, 27 November 2014
Blackberry Smoothie headband
When creativity strikes I usually end up working on half a dozen new patterns at once. One maybe two of those ideas will then make it to the point of being written up. This last couple of weeks I have been working on some Tunisian crochet ideas and a couple of days ago I finished a rough draft of a tunisian hat. It needs some refining to make the numbers add up but it may well make it to being written up properly!
Just as I had finished, a couple of people asked me to make them a headband to keep their ears warm. I love the fit of the Tunisian knit stitch band so I upped the stitch count a little and came up with this:

Snug and cosy! The yarn is superwash merino so easy care (yay!) aaaaand the headband should keep it's shape pretty well too. I managed to get 2 of these out of a 50g (165m/180yd) skein of sportweight merino. However the pattern works as well in dk weight too :)
Finished size: 15" around (to fit a 22" head) 3.5" wide
You will need:
Stitches used: This piece is worked in Tunisian knit stitch (TKS). To make the stitch, push hook between the two vertical bars in the stitch you are working into, and pull up a loop. Continue across like this - in the last (end stitch) pull up a loop as normal.
Return pass: YO, pull through first, *YO pull through 2* across until one loop remains. Start next row!

1. Ch 20
2. Forward pass, return pass
3. TKS in each stitch across, return pass.
Repeat row 3 until piece measures approx. 15" (mine is 86 rows total). With right sides facing each other, sl st together matching stitches. Fasten off and weave in ends.
Or if you prefer, work a Tunisian bind off row to finish and whip stitch together.
You could add buttons or crochet flowers to decorate.
Repeat row 3 until headband reaches size required. Mine are 86 rows long for a 22" head.
Snug and cosy! The yarn is superwash merino so easy care (yay!) aaaaand the headband should keep it's shape pretty well too. I managed to get 2 of these out of a 50g (165m/180yd) skein of sportweight merino. However the pattern works as well in dk weight too :)
Finished size: 15" around (to fit a 22" head) 3.5" wide
You will need:
- 50g sport weight merino (I used Katia Merino Baby in purple)
- 5mm hook (standard length is fine, all the stitches will fit!)
- darning needle to weave in ends
Stitches used: This piece is worked in Tunisian knit stitch (TKS). To make the stitch, push hook between the two vertical bars in the stitch you are working into, and pull up a loop. Continue across like this - in the last (end stitch) pull up a loop as normal.
Return pass: YO, pull through first, *YO pull through 2* across until one loop remains. Start next row!
1. Ch 20
2. Forward pass, return pass
3. TKS in each stitch across, return pass.
Repeat row 3 until piece measures approx. 15" (mine is 86 rows total). With right sides facing each other, sl st together matching stitches. Fasten off and weave in ends.
Or if you prefer, work a Tunisian bind off row to finish and whip stitch together.
You could add buttons or crochet flowers to decorate.
Repeat row 3 until headband reaches size required. Mine are 86 rows long for a 22" head.
Monday, 15 September 2014
Rustic Wrap Cardi
I was having a sort through my stash at the weekend. I'm pleased to report I've now made a reasonable dent in it and I've managed to clear a whole trug! While I was going through everything I found a few yarns I had left over from my cloth nappying days and thought I should make something with it. I wanted a cardigan pattern but as is so often the case, I couldn't find exactly what I was looking for, so I came up with my own pattern.

The finished cardi has a 24" chest (approx age 5), if you need to adjust this you could add a couple more chains when you form armholes.
You will need:
6.5mm hook
300g worsted/aran or bulky weight yarn. The original is made with Arucania Magallenes which is a thick and thin slubby-esque yarn.
4 stitch markers
1. Ch51, dc in 3rd ch from hook (turning ch does not count as stitch here or throughout) and each st across, turn (49)
2. Ch2 (doesn't count!) 2dc in first st, dc in each stitch across, 2dc in last, turn (51)
3. Ch2, 2dc in first, dc in next 11, 3dc place marker in first and 3rd stitches just made, dc in next 25 sts, 3dc place marker in first and 3rd sts just made, dc in next 11, 2dc in last, turn (57)
4. Ch2, 2dc in first, dc to first marked st, *3dc in marked st, move marker to first st of cluster, dc to next marked st 3dc in marked st, move marker to third st of cluster, * dc to next marked st, rep **, dc to last, 2dc in last, turn (67)
5-10. Repeat row 4, increasing by 10 stitches on each row > (77, 87, 97, 107, 117, 127)
To form armholes:
11. Ch2, 2dc in first, dc to first marked st, ch2, sk both marked sts and those in between and rejoin with a dc in st after second marked st, dc across to third marked st, ch2, sk both marked sts and those in between and rejoin with a dc in st after fourth marked st, dc to last, 2dc in last, turn. (71)
Leave markers in to help you see where you need to work when you join the sleeves.
12. Ch2, 2dc in first, dc to last (remember to work a dc in each ch under arm (2dc in each ch2 sp), 2dc in last, turn (73)
13- 28: Repeat row 12
Do not fasten off!!
Finishing round: turn your work to work along side of front up towards neck band, ch1, work 2sc in each dc row end to first neck corner, work 3dc in corner st, sc in each st around neck, 3sc in next corner sp, 2sc in each dc row end to next corner, 3sc in corner sp, sc in each st to last corner, 3sc in last corner, join with a sl st, fasten off and sew in ends.
To work sleeves, make sure you working in the opposite direction to previous yoke row!
1. Join with a sl st in one of the ch sps under arms, ch2, dc in same sp, dc2tog across dc row end and marked st (remove marker), dc in each st around to marked st, work dc2tog across marked st and dc row end, dc in other ch sp, sl st to join round, turn. (33)
2-19: ch2, dc in each st around, join with a sl st in top of first st of round, turn (33)
Fasten off, weave in ends, sew on buttons! There are no buttonholes in this pattern, just use the holes in the fabric.

You will need:
6.5mm hook
300g worsted/aran or bulky weight yarn. The original is made with Arucania Magallenes which is a thick and thin slubby-esque yarn.
4 stitch markers
1. Ch51, dc in 3rd ch from hook (turning ch does not count as stitch here or throughout) and each st across, turn (49)
2. Ch2 (doesn't count!) 2dc in first st, dc in each stitch across, 2dc in last, turn (51)
3. Ch2, 2dc in first, dc in next 11, 3dc place marker in first and 3rd stitches just made, dc in next 25 sts, 3dc place marker in first and 3rd sts just made, dc in next 11, 2dc in last, turn (57)
4. Ch2, 2dc in first, dc to first marked st, *3dc in marked st, move marker to first st of cluster, dc to next marked st 3dc in marked st, move marker to third st of cluster, * dc to next marked st, rep **, dc to last, 2dc in last, turn (67)
5-10. Repeat row 4, increasing by 10 stitches on each row > (77, 87, 97, 107, 117, 127)
To form armholes:
11. Ch2, 2dc in first, dc to first marked st, ch2, sk both marked sts and those in between and rejoin with a dc in st after second marked st, dc across to third marked st, ch2, sk both marked sts and those in between and rejoin with a dc in st after fourth marked st, dc to last, 2dc in last, turn. (71)
Leave markers in to help you see where you need to work when you join the sleeves.
12. Ch2, 2dc in first, dc to last (remember to work a dc in each ch under arm (2dc in each ch2 sp), 2dc in last, turn (73)
13- 28: Repeat row 12
Do not fasten off!!
Finishing round: turn your work to work along side of front up towards neck band, ch1, work 2sc in each dc row end to first neck corner, work 3dc in corner st, sc in each st around neck, 3sc in next corner sp, 2sc in each dc row end to next corner, 3sc in corner sp, sc in each st to last corner, 3sc in last corner, join with a sl st, fasten off and sew in ends.
To work sleeves, make sure you working in the opposite direction to previous yoke row!
1. Join with a sl st in one of the ch sps under arms, ch2, dc in same sp, dc2tog across dc row end and marked st (remove marker), dc in each st around to marked st, work dc2tog across marked st and dc row end, dc in other ch sp, sl st to join round, turn. (33)
2-19: ch2, dc in each st around, join with a sl st in top of first st of round, turn (33)
Fasten off, weave in ends, sew on buttons! There are no buttonholes in this pattern, just use the holes in the fabric.
Wednesday, 10 September 2014
Draco Shawl
It's been a while since I posted, but I have a good excuse: I accidentally came up with a new pattern! As so often happens with me, I was messing around with one idea and ended up with something completely different to what I had intended. Completely and marvellously different. I have had a touch of the Willy Wonka creativity with this one!
So, I crocheted my way through my original draft, thinking first that I would end up with a triangle, then that I would have a parallelogram on my hands. I got my husband to help me stretch it to check it would be long enough post blocking... Then I blocked it and was totally surprised by the shape!
 The kids decided it looked like a dragon wing. I hadn't written down the pattern. I would need to make another one.
So I did. Only I have been beading a lot of my shawls recently and considered how I might bead this one. At first I thought I should just do the tips of the points but hey I had a lot of beads... maybe I should try something different...
So I crocheted and wrote down what I did. The beading took aaages until it dawned on me I should probably just get a really tiny crochet hook. The project sped right up and I was finished in a week! I'm so glad I chose a yarn with silk in, the drape was much better in the second version of the shawl.

 The pattern is also available in my etsy store: RedcloverCrochet at the full price of £2
So, I crocheted my way through my original draft, thinking first that I would end up with a triangle, then that I would have a parallelogram on my hands. I got my husband to help me stretch it to check it would be long enough post blocking... Then I blocked it and was totally surprised by the shape!
So I did. Only I have been beading a lot of my shawls recently and considered how I might bead this one. At first I thought I should just do the tips of the points but hey I had a lot of beads... maybe I should try something different...
So I crocheted and wrote down what I did. The beading took aaages until it dawned on me I should probably just get a really tiny crochet hook. The project sped right up and I was finished in a week! I'm so glad I chose a yarn with silk in, the drape was much better in the second version of the shawl.
So that's what I did this summer! The pattern has now been tested over on Ravelry and is available with 25% off for a couple more days (till Friday), Draco Shawl . The price will then be going up to £2. Follow the link to see my testers projects, they've chosen some awesome colour combinations!
The pattern has been my most popular to date and I've learnt a new skill - charts in excel! I've also made a third version with matching yarn and beads:
Monday, 2 June 2014
Tri Cowl
I was recently working on testing a pattern for the lovely Aoibhe Ni on ravelry and took the opportunity to go stash diving in search of some yarn for the project (read I have no cash to go yarn shopping - woe is me!) and discovered a bundle of stylecraft merino I had bought on sale several years ago. I have not stopped crocheting with it for a week or more and it has been turned into a tank top, a slouchy hat, and this cowl. I had only 1 ball of the red I've used here so I decided a colourwork cowl was in order to stretch it out into a whole project. I ended up stretching it out so far that I am now working on matching mitts (pattern to follow!).
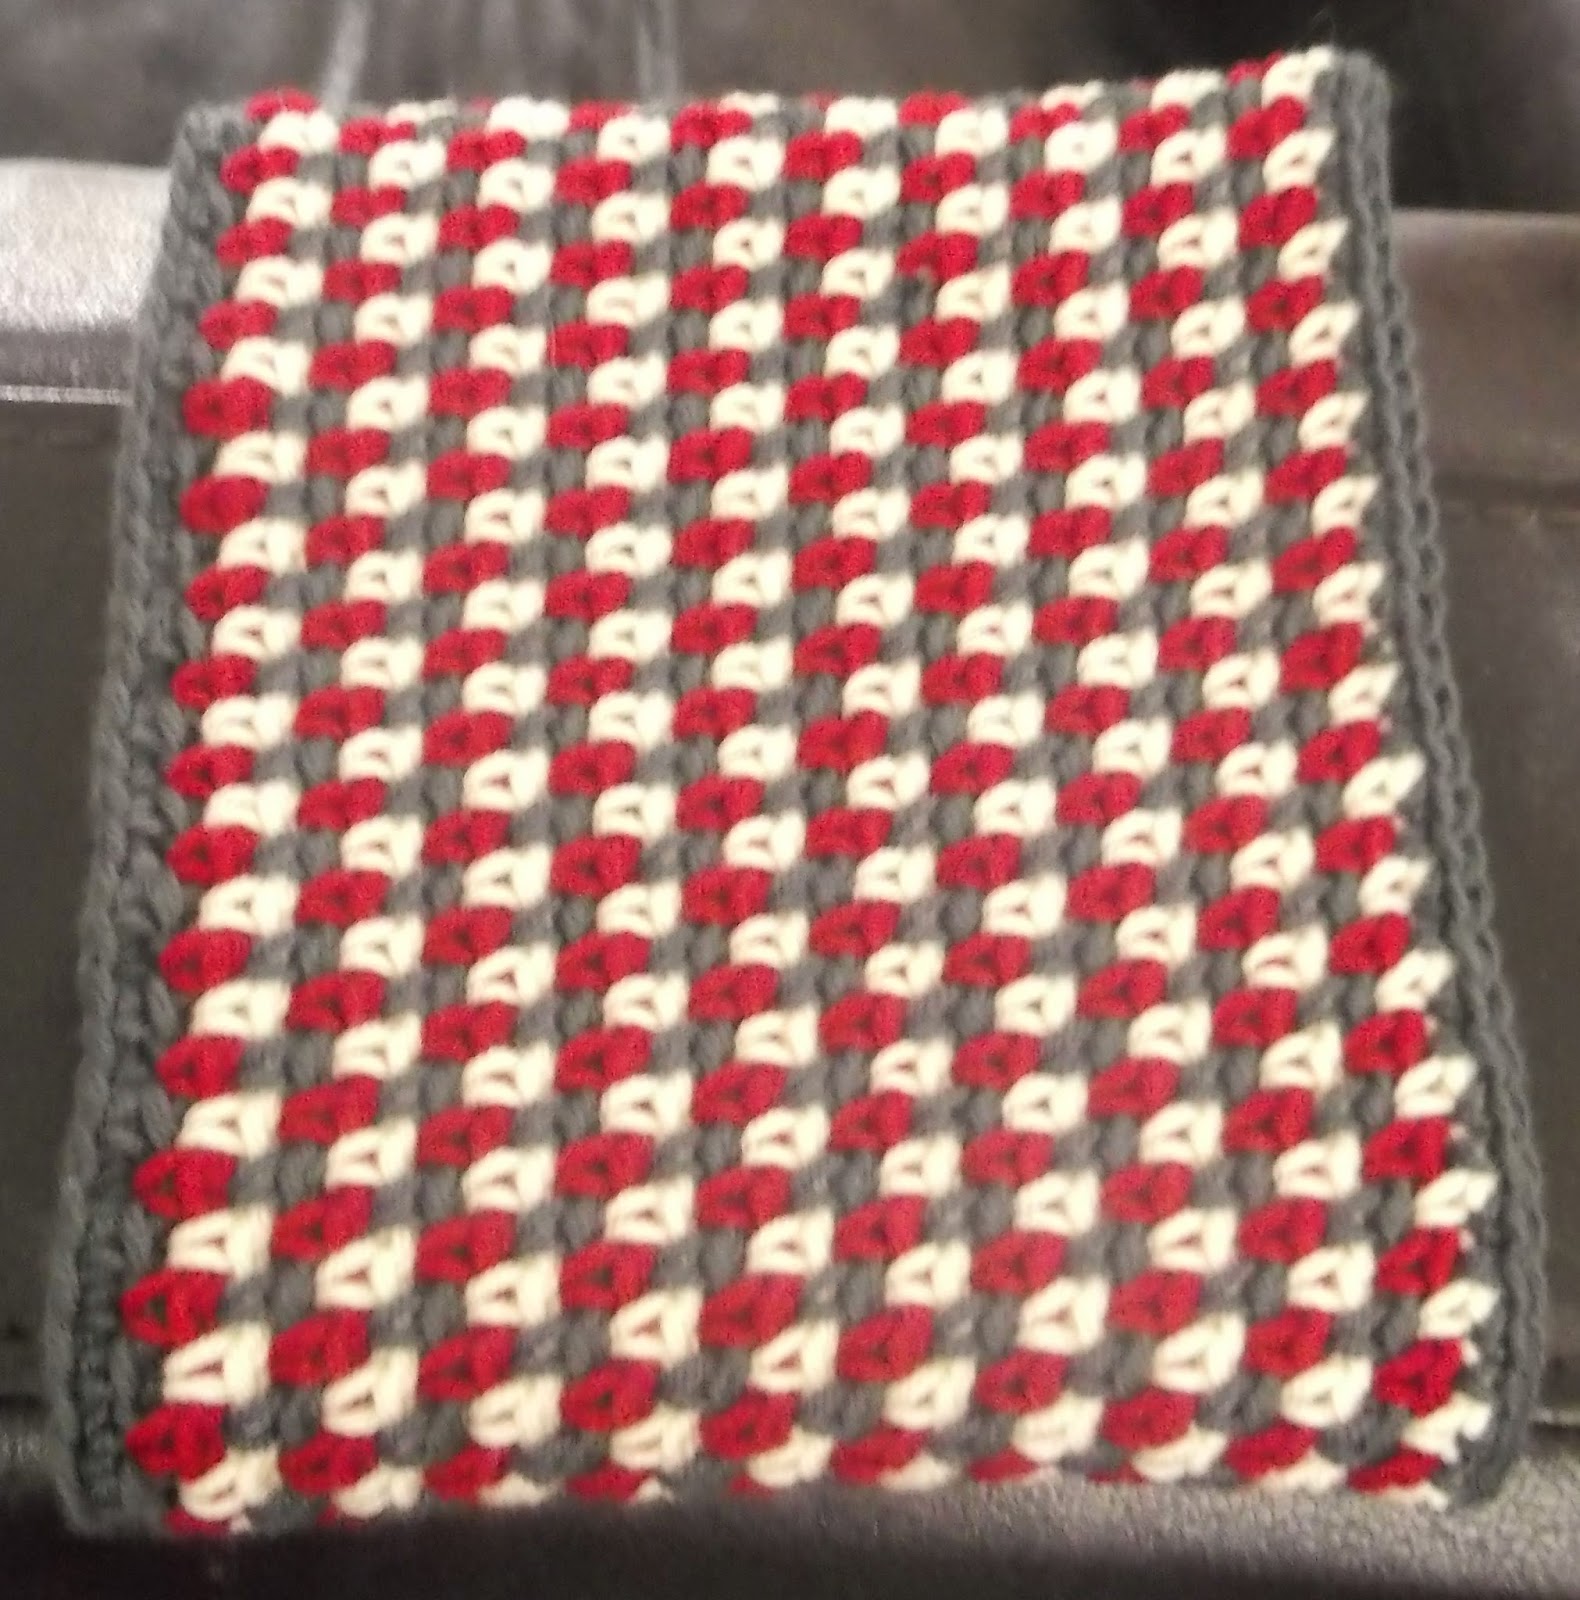
The measurements for this cowl are 24" around and 5.5" deep, this can be adjusted by changing the length of the starting ch, as long as you start with an even number on the chain, the pattern should work fine!
So, for this project you will need:
50g dk weight yarn x 3 - in 3 different colours you think would look good together, I've gone for quite a loud combo of gunmetal grey (main colour MC), deep red (CC1) and cream (CC2), but I think this could look good in tonal shades too :)
(My original yarn is Pure Luxury Merino by Stylecraft 119m/130yds per 50g ball, long since discontinued :( A similar yarn to try would be Debbie Bliss' Cashmerino dk)
5mm hook
Stitches used: Nothing too fancy, this is all sc and ch, but you will need to change colour at the end of each round by working the last YO and pull through in the next colour.
1. In MC, ch120, sc in 2nd ch from hook and each ch across, changing to CC1 in last st (119)
(like the autumnal cowl, this could be worked in the round by joining the foundation ch with a sl. st and working in a continuous spiral, but as I like to work into the bottom bump for the sake of neatness I always end up with a twisted ch that I can never rectify no matter how many times I rip out my work and re-try!)
2. Ch1, and without turning, check your work is not twisted and join to form a circle by working a sc in 2nd sc of row one (skip the first). *Ch1, sk1, sc* around, changing to CC2 in last st of round
For this pattern, to keep the colour changes neat, on every second row I worked the last sc of the round into the first ch of the round in the same colour, this 'stepped' the colour changes and kept them in a straight line.
3. *Ch1, sk 1, sc* around, changing back to MC in last stitch of round
Continue in pattern until you have 30 rows completed (10 complete bands of each colour), in last stitch change to MC
31. In MC, sc in each ch sp and each sc around, sl st to join round, fasten off and weave in ends.
The measurements for this cowl are 24" around and 5.5" deep, this can be adjusted by changing the length of the starting ch, as long as you start with an even number on the chain, the pattern should work fine!
So, for this project you will need:
50g dk weight yarn x 3 - in 3 different colours you think would look good together, I've gone for quite a loud combo of gunmetal grey (main colour MC), deep red (CC1) and cream (CC2), but I think this could look good in tonal shades too :)
(My original yarn is Pure Luxury Merino by Stylecraft 119m/130yds per 50g ball, long since discontinued :( A similar yarn to try would be Debbie Bliss' Cashmerino dk)
5mm hook
Stitches used: Nothing too fancy, this is all sc and ch, but you will need to change colour at the end of each round by working the last YO and pull through in the next colour.
1. In MC, ch120, sc in 2nd ch from hook and each ch across, changing to CC1 in last st (119)
(like the autumnal cowl, this could be worked in the round by joining the foundation ch with a sl. st and working in a continuous spiral, but as I like to work into the bottom bump for the sake of neatness I always end up with a twisted ch that I can never rectify no matter how many times I rip out my work and re-try!)
2. Ch1, and without turning, check your work is not twisted and join to form a circle by working a sc in 2nd sc of row one (skip the first). *Ch1, sk1, sc* around, changing to CC2 in last st of round
For this pattern, to keep the colour changes neat, on every second row I worked the last sc of the round into the first ch of the round in the same colour, this 'stepped' the colour changes and kept them in a straight line.
3. *Ch1, sk 1, sc* around, changing back to MC in last stitch of round
Continue in pattern until you have 30 rows completed (10 complete bands of each colour), in last stitch change to MC
31. In MC, sc in each ch sp and each sc around, sl st to join round, fasten off and weave in ends.
XXXXXXXXXXXXXX
XOXOXOXOXOXOXO
OXOXOXOXOXOXOX
XXXXXXXXXXXXXX
* * * * * * * * * * * * * *
Subscribe to:
Posts (Atom)