Wednesday, 27 February 2013

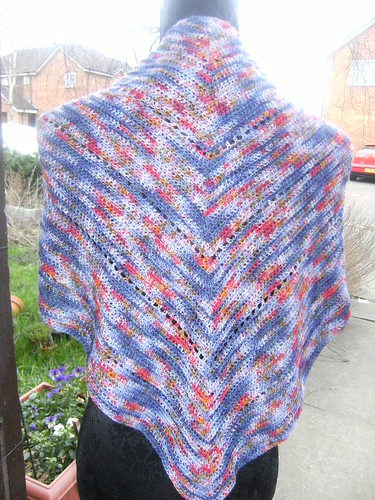
Lunasadh Fires shawl


I've been working on a number of shawl patterns and this one is the first to be finished.  I've had this Elvincraft yarn in my stash for a loooong time and it has been started off as a number of projects but I've never been happy with how the colours worked with the pattern so it was high time I came up with my own pattern.
Lunasadh Fires shawl is made using a 4mm hook and 800m of laceweight yarn.  It's a nice simple pattern, perfect for working on when you need a mindless project that can easily be picked up and put down at a moment's notice. (US terms in pattern)
1. Ch3, 3 hdc in 3rd ch from hook, ch1, 4hdc in same space, turn
2. Ch2, 2 hdc in first, hdc in next 3, in centre ch sp work *hdc, ch1, hdc*, hdc in next 3, 2hdc in top of ch2, turn
3-9: Ch2, 2hdc in first, hdc across to centre ch sp, *hdc, ch1, hdc* in ch sp, hdc across to last st, work 2hdc in last st, turn
10: Ch3 (counts as hdc, ch1), hdc in first (beginning v st made), *ch1, sk1, hdc* across to centre ch sp, work *hdc, ch1, hdc, ch1, hdc* in ch sp, *ch1, sk1, hdc across, in last st work *hdc, ch1, hdc* (v st), turn.
11-24: Work as rows 3-9
25: Repeat row 10

Continue with 14 rows of solid hdc and every 15th row as an eyelet row.  My shawl had 5 eyelet rows and 6 solid hdc sections.  Block as needed.

This pattern would be good to experiment with adding a lace border but I didn't feel that would work with this yarn as it is too busy.

This pattern is for personal use only.  Enjoy :)

busy busy busy!

From late Autumn until the end of Winter I can usually be found making hats for a local company, this year I have made nearly 200 hence my lack of blog posts!  However, hat making season is nearly at an end and I have managed to steal some time to update my blog.
I have now submitted my  shawl pattern to p-hop and I'm waiting to hear when it will go up on their site for download.  I ended up renaming the shawl as October Leaves shawl after discovering a multitude of patterns using the original name!
My testers creatingincanyon, knotanother1 and hookedonhook all tested in solid/semi solid colours and I have to say I think it looks very striking in a single colour yarn!

Back in the Summer we welcomed a new addition to the family, a young rescue greyhound called Marcus.  He made himself at home very quickly an unfortunately got hold of one of my shawls and chewed it so I ended up having to frog it back more than halfway!  I quickly forgave him though - one look at that pointy face and I knew he was sorry!  As Summer came to an end I turned my attention to making him a snood that would actually stay put after having to retrieve a knitted acrylic cowl out of a muddy puddle - not nice!  I decided that a pure wool snood would be perfect, it would stay dry and not soak up water like the acrylic version and if I made it in a ribbed stitch it should stay put as he raced around the park.  I'm pleased to say after months of wear it is still staying on although it has gone a little baggy now but I'm still pleased as it has been worn almost daily!  The pattern will go up on Ravelry for sale soon with £1 from each sale going to GRWE where we were lucky enough to find Marcus.

Tuesday, 23 October 2012

p/hop and MSF

So a while ago I set (and blogged about) an intention to donate a pattern to p/hop to raise money for MSF.  As I have been in the 12 shawls in 2012 challenge on Ravelry it made sense to write a shawl pattern, and here is a dodgy picture of the finished article being blocked:
 
I still haven't managed to get a decent picture of the shawl, it has been a miserable mix of rain and fog for the last week or so and my photography skills are pretty basic so I've left 'final pictures of fabulous shawl' on the to-do list for the time being!  Besides, over the next week I plan to offer the shawl on the free pattern testers forum on ravelry so I'm hoping if all else fails at least there will be some decent pictures available to me there!
The pattern itself is just about written up and is inspired by Aoibhe Ni's tunisian shawls, although it uses shorter linked stitches so I could get around the corners.
Hopefully it'll raise some much appreciated funds for an amazing organisation.
 

Hopscotch cowl


Well it's been a while since I posted on my blog but I have been busy creating in real life!  First things first I have written and published my first pattern for sale.  For the princely sum of £2 you can purchase the pattern for hopscotch cowl on Ravelry.  I'm quite proud of myself and did a slightly embarrasing little dance round the room when I sold the first copy!
It uses post stitches, chevrons and a slightly lacy middle section as well as chunky buttons to give it a solid textured feel without being too heavy.

Tuesday, 26 June 2012

top banana hairbands

In my continued quest for things to sell on my first craft stall I have come up with a number of patterns that don't take too long to make or use up acres of yarn.  I figured these two points would be essential if I want to sell anything and make a bit of a profit - there's not many people at a local craft fair who'd be prepared to pay for an intricately stitched, time consuming thingamibob costing £20, £30, £40.  So I raided my scrap-bag and found this lovely boo sock yarn I bought from babylonglegs last year to make some socks for my son.  I then raided my daughter's room for some unused (because she still doesn't have enough hair for them!) hair elastics and got to work!  These take about 20 minutes to make and can be adjusted in length/width as needed.


You will need a 4mm hook and some left over yarn (this is sock yarn but I've also used aran with a larger hook, works out fine)

1.  Join yarn around hair elastic with a slip stitch, ch1, make 7 sc stitches across, ch1, turn
2. sc across, ch1, turn
3.  Sc in first, 2 sc in next, sc in next 3, 2sc, sc in last, ch1, turn
4 - 65: *sc, ch1, sk 1* across, sc in last, ch1, turn
66: sc, sc2tog, sc in next 3, sc2 tog, sc, ch1, turn
67: sc across, ch1, turn
68: work a final row of sc around hair elastic, bind off and weave in ends.

(For personal use only)

Wednesday, 6 June 2012

MSF and p/hop

I found out about www.p-hop.co.uk at a local Ravelry event a few years ago and as well as publishing patterns on my blog, it has always been at the back of my mind to donate a pattern or two.
For those who haven't heard about p/hop, it is a brilliant idea :)  Basically you choose a pattern from the site to download and then decide how much you think the pattern is worth and donate the money.  The money goes to MSF to support their fantastic and vital work.
So the plan is to work on an idea I had for a shawl based on a large shell pattern.  Once I am happy with it I will submit it and post about it on here.  Watch This Space!!  (Although not too closely, I'm not the fastest worker!!)

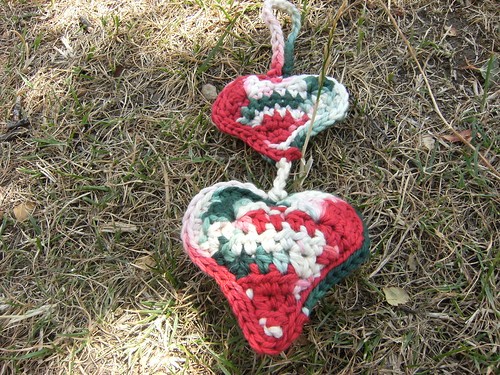
Narrowboat hearts

I came up with these a while ago after my mum asked me to make her something small for her narrowboat.  They are made in worsted cotton with a 4mm hook and can be stuffed with fluff or with lavender or other dried scented herbs.  Although I've not tried it I imagine they'd also work well with a drop or 2 of essential oil (although the oil might affect the colour of the cotton so try it at your own risk!  For my hearts I suffed with fluff and made a pocket within the fluff to fill with lavender.
You will need: 4mm hook, worsted weight cotton and fibrefill to stuff.

Make 2 small and 2 large hearts before binding together and stuffing.

Small Heart (make 2)
1. Ch2, sc in 2nd ch from hook, turn.
2. Ch1, 2sc, turn
3. Ch1, 2sc in each st, turn (4)
4. Ch1, 2sc in 1st st, sc across, 2 sc in last st, turn (6)
5 + 6: Repeat row 4
7: Ch1, sl st in 1st st, sk 1, 5dc in next st, sk1, sl st in next 2 st, sk1, 5 dc in next st, sk1, sl st in last, turn.
8: Ch1, sc, 2hdc in next 4 st, sc, sl st 2tog, sc, 2hdc in next 4 st, sc in last.  Do not turn.
9: Work sl st evenly around edge of heart.  When you get to the gully (centre dip) at the top of the heart work sl st 3tog, sl st to end.  Fasten off and weave in ends.

Large Heart (make 2)

1. Ch3, hdc in 3rd ch from hook, turn
2. Ch2, 2hdc, turn
3. Ch2, 2hdc in both st, turn (4)
4. Ch2, 2hdc in 1st, hdc across, 2hdc in last, turn (6)
5 + 6: Repeat row 4
7: Ch1, sl st in 1st st, sk1, 5dc in next, sk1, sl st in next 2, sk1, 5dc in next, sk1, sl st in last st, turn
8. Ch1, sc, 2hdc in next 4, sc, sl st 2tog, sc, 2hdc in next 4, sc in last.  Do not turn.
9: Work sl st evenly around edge of heart. When you get to the gully (centre dip) at the top of the heart work sl st 3tog, sl st to end. Fasten off and weave in ends.

Construction

Starting with the 2 large hearts and beginning at the gully (centre top dip): Sl st in BLO through both hearts around to join together.  When you get to the last section, stop and stuff with fluff/lavender etc, continue in sl st BLO to join hearts.  Do not fasten off!
Work ch3 and holding the 2 smaller hearts together begin sl st BLO at points of bottom of smaller hearts.  Sl st BLO around to gully, work ch 20 and rejoin with a sl st in same st as last one worked to form a hanging loop (this can also be left out or the length of the chain altered depending on what is required), continue in sl st BLO until a small gap remains, stuff with fluff/lavender and continue sl st BLO to starting point on smaller hearts.  Fasten off and weave in ends :)